 |
| The Give a Hoot - Trendy Owl Hat |
I've been seeing a lot of darling crochet owl hats and wishing I could figure out some way to make round funky eyes. Finally while I was looking at a tutorial on how to make flowers on the 12 peg loom, I realized I had the means to make round and funky sitting right before me the whole time...
Pattern Information
Knitting Loom: Knifty Knitter 24 peg "Preemie" loom and the 12 peg "Flower" loom for the owl's eyes
Yarn:
Color A: Brown Flecked #4 size yarn
Color B: Red Heart "Raspberry" #4 size yarn
Color C: Red Heart "Sage" #4 size yarn
Color D: Red Heart "White" #4 size yarn
Color E: Red Heart "Black" #4 size yarn
Color F: Red Heart "Bright Yellow" #4 size yarn
Skill Level: Intermediate
Abbreviations:
k = knit
p = purl
Instructions:
With Yarn Color A, cast on 24 pegs.
BRIM
Rows 1-8: knit to the end
BODY
Switch to Yarn Color B
Rows 9-20: knit to the end
Switch to Yarn Color C
Rows 21-40: knit to the end
Remove loops carefully from one side of the loom and place over the pegs on the other side of the loom. Knit together. Knit across. Remove using chain cast off.
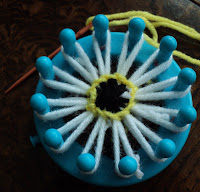
To create the owl's "eyes": Switch to the 12 peg "Flower" loom. Switch to Yarn Color D. Follow these instructions for a layered wrap:
Layered Wrap
 |
| Layered Wrap |
Switch to Yarn Color E. Follow these instructions for a over sewn center
Oversewn Centre
 |
| Over-sewn Center |
Chain Cast Round
 |
| Chain Cast Round |
Backstitch rounds
 |
| Backstitch Rounds |
 |
| More Backstitch Rounds |
 |
| Outer Ring of Back stitches |
 |
| Removed from the loom |
Use the tail of the yarn to sew eye to the hat.
Repeat for other eye.
Locate the center of the hat. Move two rows over and follow this chart to create the pony's right eye:
To make the owl's "beak": Using Yarn Color F, cast on seven pegs.
Rows 1- 5: knit to the end of the row
Decrease size of beak by moving the loop on peg 1 to peg 2 and the loop on peg 7 to peg 6.
Rows 6-9: knit to the end of the row (on pegs 2 and 6, you will be knitting over 2 loops)
Decrease beak again by moving loop on peg 2 to peg 3 and the loop on peg 6 to peg 5
Rows 10 -13: knit to the end of the row (on pegs 3 and 5, you will be knitting over 2 loops)
Decrease by moving peg 3 to peg 4; knit over; then move peg 5 to peg 4; knit over.
- Knit again.
- Cut yarn, leaving around an 8" tail.
- Remove from peg. Pull tail through loop and pull tight.
- Using a crochet hook, pull tail through the body of the ear.
- Thread tail into plastic tapestry needle. Use to sew beak to hat.
 |
| Place hat back on the loom to add earflaps |
Locate the spot that you wish to be the right side of the hat. Using Yarn Color A, cast on seven pegs over the the original first row of the hat.
Rows 1- 5: knit to the end of the row (The row in this case is the seven pegs you cast on over the original loops)
Decrease size of earflap by moving the loop on peg 1 to peg 2 and the loop on peg 7 to peg 6.
 |
| Earflap |
Rows 6-9: knit to the end of the row (on pegs 2 and 6, you will be knitting over 2 loops)
Decrease earflap again by moving loop on peg 2 to peg 3 and the loop on peg 6 to peg 5
Rows 10 -13: knit to the end of the row (on pegs 3 and 5, you will be knitting over 2 loops)
 |
| Adding Ties to the Earflaps |
Decrease by moving peg 3 to peg 4; knit over; then move peg 5 to peg 4; knit over.
- Knit again.
- Cut yarn, leaving around an 8" tail.
- Remove from peg. Pull tail through loop and pull tight.
Repeat process on the other side of the loom for the other earflap.
To create owl's "ears": Wrap strands of Yarn Colors A, B, and C around three of your fingers four times. Slip wrap off fingers and tie inside the loops. Thread the ends of this tie inside the hat and tie securely. Wrap a strand of Yarn Color A several times around the loops and tie securely. Cut and trim the ends of the loops. Repeat for the other side.
No comments:
Post a Comment